
TIPS
Is an ipe deck installation different from other woods? Wood is wood. The big difference is the hardness. People new to the product frequently do not add enough labor time. Everything has to be pre-drilled. If you do not predrill your screw will noodle on you. You need to use Stainless Steel. If you use a coated screw you may get a callback in 6 months due to rust stains. The rust stains will be on Pine decks, but those customers do not have the same expectations. You want to add time to apply finisher. Again, with a pine deck they are frequently left unfinished. The Brazilian decking customer is more discriminating.
Hidden Fasteners, Clips vs Plugging – Cost and time. Nothing looks better than a plugged deck. It will last forever and look like fine craftsmanship. In the past, plugging was very time intensive. Today, check out the pro-plug system for plugging. It has dramatically cut down the time to drill and plug. If you want to use the Clip system the newer models are much stronger and have wind lift statements that your local zoning may need to certify in hurricane prone areas.
Ipe vs Composite – common reasons customers call mad about composites. We do not sell composites so we do not know the details of composite decking. The common reasons customers call us about replacing such decks seem to center around the following three areas. 1) they have dogs whose nails are leaving in “run” patterns. 2) they dropped charcoal from a grill and it melted the decking. we also get calls about grease splatter. 3) sagging between joists. As we do not sell those products and there are a lot of different manufacturers that are constantly improving we cannot advise you which composites have these issues. We just wanted to share the issues we hear frequently so that you can be aware of them when you are talking to your customers.
Table of quick hints
Installation
Conventional Decking
5/4 or 4/4 x6
What it is: Same basic techniques you use for any other decking.
How to: Face Screws You need to pre-drill. Use Headcotes / Smart-bits to predrill faster and have a screw with no mushrooming. Hidden Fasteners – DeckClips screw directly into the joist which is faster than IpeClips that require pre-drilling
Bottom Line: Ipe is hard so you should be prepared to pre-drill. Be sure you allow labor time in your bid.
Spacing
Conventional Decking
5/4 or 4/4 x6
What it is: The spec is 3/32″ gap when face screwing with Headcote Stainless.
How to: Only space between boards. Always but ends together as their is no expansion / contraction in this direction.
Bottom Line: Reduce time by using a joist hanger as a spacer. It is long, flat, the right spacing, and you probably have several left over from framing.
Installation
Tongue and Groove
What it is:T&G Decking is blind nailed or screwed so that water can get through and is only recommended on covered porches. Remember that T&G decks are not waterproof – you must always allow for drainage and ventilation because there will not be a dry area underneath.
How to: T&G decking is not indoor flooring and must not be installed too tightly. A deck may end up buckling if boards are jammed together too tightly during installation. Click here for a Decking Wisdom’s sheet
Bottom Line: Avoid Warranty call backs during the summer due to buckling.
Inlay
![]()
What it is: Similar to interior wood flooring, you can add borders and designs to decks. This creates a truly custom high end deck. For example: The body of the deck can be Tigerwood with Jatoba borders and designs. You can also coordinate Jatoba (same price but darker red) or Ipe (more expensive but brown).
How to: Lay out a design using the deck dimensions. Coordinate the border wood type with the railing. Use blocking to screw to. Click here for more specifics.
Bottom Line: Close more deals. This technique is rarely mentioned by average deck builders. It is simple, adds little if any cost, and sets you apart from the crowd.
Grooving (Kerfing)
What it is: Grooving the side of the board for hidden fasteners such as Deck Clip and Ipe Clip.
Why you need it: The alternative is using a Biscuit Cutter on site. When the decking runs 90 degrees to the joists this is time consuming, decking is laid 45 degrees adds to the difficulty. TIME: 350 biscuit joints on 100 SQ FT of decking, 1×6 on 16″ centers.
Bottom Line: Kerfing reduces time onsite. This minimizes weather delay issues and moves you to the next job.
End Seal aka “Wax”

What it is: A thick white liquid wax emulsion made by Anchorseal.
Why you need it: It prevents checking (cracking) of cross cut boards. It is cheap and easy (quick) to install.
Bottom Line: Avoid customer call backs for warranty work due to end cracking.
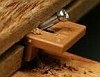
BoWrench
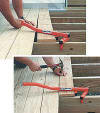
What it is: This is a tool that quickly allows installation of long deck boards.
Why you need it: Wood because of the natural crowning will bow. This tool moves the decking back into place for ease of installation.
Bottom Line: Reduce time and grief on the job site.
Finishing Oil
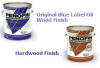
What it is:UV Inhibitor that both brings out the natural color of the wood and reduces graying.
Why you need it: Wood through the natural decay process will turn gray. Customers will not do put finishing oil on and will be upset in 6 months.
Bottom Line: Add this service either in initial quote or with a change order. you will both avoid a warrenty call and pickup a highly profitable item. I have seen local “deck finisher / refinishers” charge 35 to 50 cents / sq ft.